Newsletter checklist: A pre-publishing and post-publishing guide for new writers
Learn how to juggle the moving pieces of publishing a newsletter with this free template.
Trust is built with consistency. - Lincoln Chafee
The most successful companies and creators share one thing in common: they’re consistent.
Think about going to dinner at your favorite restaurant or cracking open a new book from your favorite author. Part of the reason you enjoy those experiences so much is that you know what to expect.
They've earned your trust by producing high-quality goods over time, thereby encouraging you to become a repeat customer.
Implementing a checklist acts as a quality assurance measure. It helps you produce the highest quality content you can on the most consistent basis possible.
How many checklists do you need?
In this article, you’ll learn about the process we use at Ghost to publish great content regularly.
A lot of productivity advice can end up being burdensome to creators. So remember, you’re allowed to apply what is useful and leave out the rest.
Many content creators organize their process using two lists:
- Pre-publishing
- Post-publishing
Pre-publishing is everything that happens after the first draft is completed, before the content is published online. Post-publishing focuses on getting the most out of the content you make, such as promotional activities, repurposing strategies, and analyzing results.
In this article, you'll discover the exact steps that go into both parts of the process, along with recommendations on customizing them for your creative practice.
Pre-publishing checklist for newsletter writers
The pre-publishing list includes all the steps you need to take after your first draft is finished.
The first draft is equal parts starting line and finish line for professional creators. On the one hand, you've worked hard to produce a newsletter you're proud of. But on the other, there's still work to be done because first drafts, by default, are unpolished.
One last note before diving in — the order of these steps is intentional. Moving steps around or taking them out of order often leads to missing pieces or repeated work. It's best to follow these steps in order until you understand them well enough to craft a personalized checklist.
Step 1. Review content goals
An important part of the process is to make sure your creations align with an overall content strategy. In order to confirm this alignment, the first step in pre-publishing is to review your goals once again.
This means answering questions like:
- Who is this for?
- What does this piece of content do or explain?
- How should this fit with my brand’s purpose?
You will be a much more effective editor if you ask these questions before jumping into the text. Then, once the answers are clear in your mind, you can move on to the next step.
Step 2. Move draft into Grammarly
Grammarly is an excellent tool that catches grammatical, spelling, and punctuation errors authors might otherwise miss.
Depending on the length of the piece being edited, this step can take anywhere from 10-60 minutes.
Copy and paste your text into the program and begin reading through its list of suggestions. If you're using a word processor like Microsoft Word, you can also upload the document and re-download it once you've made your edits.
You don’t have to take every suggestion. Some are style choices and won’t apply to every situation.
Step 3. Read edited draft aloud
The first round of editing in Grammarly can be silent. Just read the suggestions and accept as you see fit.
The second round of editing should be audible (you can either keep the draft in Grammarly or move it back to your word processor or editor). Reading your text aloud helps your ears catch errors your eyes may have overlooked.
Plus, this is one of the best ways to make sure that your content sounds and feels like it aligns with your audience’s wants, needs, and goals.
Step 4. Create 3-5 headlines
The best time to come up with article titles or subject lines is when the content is fresh in your mind. After two rounds of editing, you should have a solid grasp of what you’re trying to say and how to best entice people to read it.
In your notetaking app of choice (we like Notion), draft out a few possible headlines. Be creative. The more divergent each headline is, the more content you’ll have to work with if you want to combine different ones.
If you're struggling to come up with creative ideas, try using an AI tool like ChatGPT to help generate new ideas, and iterate from there. This can help you produce SEO-friendly, clickable titles.
Step 5. Move into a web editor or CMS (content management system)
Now that you have a clean article and a smart headline, it's time to get it ready for publication by moving it into your publishing tool of choice.
If you're a solo creator editing your own work, you might write directly in your CMS or email tool. If you're working with others, you might be using tools like Notion or Google Docs to collaborate.
The best web editor tools make your life easier by giving you plenty of room to work, powerful formatting and embedding tools, and fast response times.
Here’s a quick look at Ghost’s editor in action.
Step 6. Format your newsletter or article
At this step, your goal is to make your creation as readable as possible. Here are a few useful tips:
- Use headers to break up content blocks
- Intersperse bold and italicized text to emphasize important points
- Use bullets to make lists more user-friendly
- Use blockquotes or highlights to add weight and color to your formatting
- Ensure that all links work correctly
Great formatting can be the difference between someone spending 10 seconds or 10 minutes reading your article.
Step 7. Find and insert images
Depending on the type of content you create, you may have already collected the images you need.
If not, it’s helpful to insert your images after you’ve formatted the content so that you can see where the natural breaks occur or where you may need to add additional information in the form of visuals.
Remember to include alt text for every image you upload. Alt text (alternative text) offers users a description of the image when the picture is unable or blocked from loading. Some browsers and email providers do this for various reasons, so it’s an important step to make sure people understand your content regardless of the tools they use.
Step 8. Insert meta data
Meta data is basic information about your published newsletter.
Search engines like Google usually pull bits of information to understand what your article, blog post, or newsletter is about. By entering meta data, you can guarantee they pull the correct information (useful if you plan to make your newsletter content publicly available online).
While most of this applies to those who want to use SEO to gain traffic, Ghost also allows you to enter meta data such as tags (for organizing your content), custom email settings, and custom social media cards.
Step 9. Preview before publishing
By now, you've worked hard to create content that is edited, organized, and optimized for your readers. The final step before making your post live is to give it a last look over.
In Ghost, you can preview how your newsletter will appear on desktop, mobile devices, in email inboxes, and when shared on social media.
Things to look for during this step include:
- Spacing between different elements
- Sizing of images and headers
- Readability of the content
- Correct meta data appearing where it should
Use this preview step to get a glimpse of what your reader will see and make any finishing touches before wrapping up.
Step 10. Send or schedule your newsletter
Congratulations! You made it to the final step of the pre-publishing checklist.
Now that you've completed all the above steps, you can confidently share your work with your audience, knowing that your creation is both high quality and consistent.
Remember to check that you share it with the correct audience. Ghost allows you to segment your audience in a few different ways so that readers only ever get what they've subscribed for.
Once your post is sent or scheduled, it’s time to start on the post-publishing checklist.
Post-publishing checklist for newsletter writers
The post-publishing steps are more flexible than the pre-publishing ones because the order is adaptable. The goal of this checklist is to help you gain the most benefit from what you’ve created, which usually entails:
- Distribution
- Repurposing
- Analysis
Newer creators usually benefit most from spending more time and resources on promotion or distribution, while those with established audiences should focus on repurposing and analyzing their content for greater gains.
Here is a version of the post-publishing checklist we use at Ghost.
Step 1. Draft 3-5 social media posts
The first step is to draft the social media copy that will be shared along with the article or newsletter edition. Often, this includes an excerpt from the post itself or a question that the post answers.
Doing this step first provides you with ready-to-go copy you can use in the following steps as well.
Step 2. Share your resource in relevant communities
Adding value to niche communities is an excellent, grassroots method of growing an audience.
When sharing in communities (like Reddit, Facebook Groups, private communities, etc.), remember to obey the rules and avoid spamming your content.
Instead, find creative ways to share your content like answering questions, posting excerpts, and asking thoughtful questions to fellow members.
Step 3. Contact creators mentioned in your content (when applicable)
People like being recognized. When you have the opportunity to mention someone in your newsletter, perhaps to illustrate a point, or you referenced their quote, take a minute to tell them.
Send them a short email thanking them for their work and ask them if you can send them a link to what you’ve written. If they are active on Twitter, mention them in a tweet that links to your publication.
You'll be surprised how often sentiments like this are received positively. It's also a great way to begin networking with other names in your industry.
Step 4. Repurpose your content
Transforming your written content into audio or video formats can be a powerful multiplier for your growth. Tools like Wavve and Descript can help make this process easier.
One common tactic is to take screenshots of key points in your articles and share those images on various social media platforms.
When you expand the format your content is available in, you expand the pool of people you can reach.
Step 5. Analyze and iterate
The final step is to study the results of your content so that you can learn how to improve in the future.
In Ghost, you can get a glimpse of your most important analytics right in the dashboard.
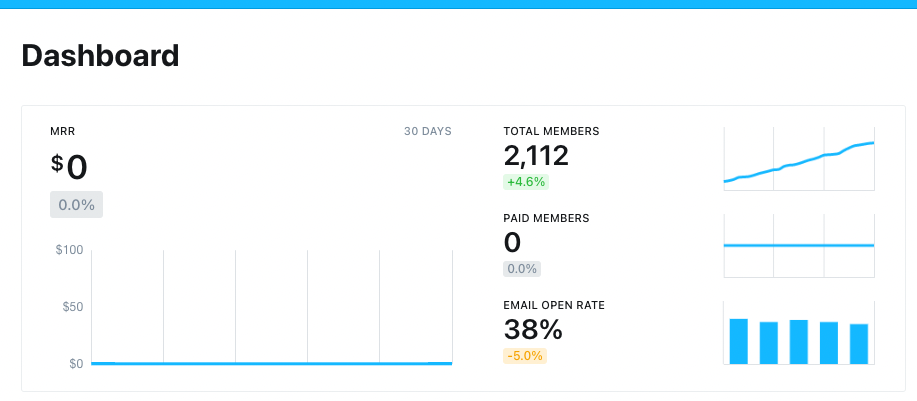
From there, you can dive deeper to see the statistics for individual posts and members. For additional data, you can also integrate your Ghost site with tools like Google Analytics, Plausible, and more.
For consistent publishing, use checklists
Creating a great product your audience loves is no easy feat. But you can streamline the process by using lists like these and become a publishing powerhouse in no time!
For easy access to these checklist resources, subscribe below to gain immediate access to a Notion template. The template includes ready-to-use checklists, sample text to use when contacting creators, and links to additional resources to help you level up your newsletter.